Purpose
This article will provide you with the steps to configure the GPU settings for BlueStacks.
Benefits
You will be able to use BlueStacks more efficiently.
Audience
Users who are experiencing issue while playing trending app on BlueStacks.
BlueStacks versions affected
All versions of BlueStacks
Geo's affected
All Geo's
Steps for switching to dedicated graphics card for:
Nvidia Cards
Configure your computer to use the NVidia GPU as the primary graphics card for your system:
1. Right Click on your desktop, and choose NVidia Control Panel, or launch the NVIDIA control panel via the Start menu.
2. Click Manage 3D Settings > Global Settings tab as shown below
3. Select High-performance NVidia processor from the dropdown list.
4. Click Apply.
Configure a specific application to use the NVidia GPU:
1. Right Click on your desktop, and choose NVidia Control Panel.
2. Click Manage 3D Settings > Click the Program Settings tab.
3. Choose your desired program from the list. If your program is not in the list, uncheck the box.
Show only programs found on this computer.
4. Choose the processor you want to use from the dropdown menu in step number 2.
5. Select High-performance NVidia processor from the list.
6. Click Apply.
ATI/AMD Radeon Cards
NOTE: There is a huge variation in versions of the ATI/AMD Radeon Catalyst Control Center for adjusting the settings for these cards so the following should be seen more as indicative than actual.
Even if your Control Center looks different to these images, the principles are the same and you should be able to find similar options to those described here.
1. For ATI/AMD Radeon cards, go to Graphics > PowerPlay - Set Plugged In and Battery to Maximum Performance. Click Apply.
2. If applicable to your graphics card, go to Graphics > 3D and move the slider across to Performance so it is set for Optimal Performance. Click Apply. NOTE: This function might not be available on all ATI models.
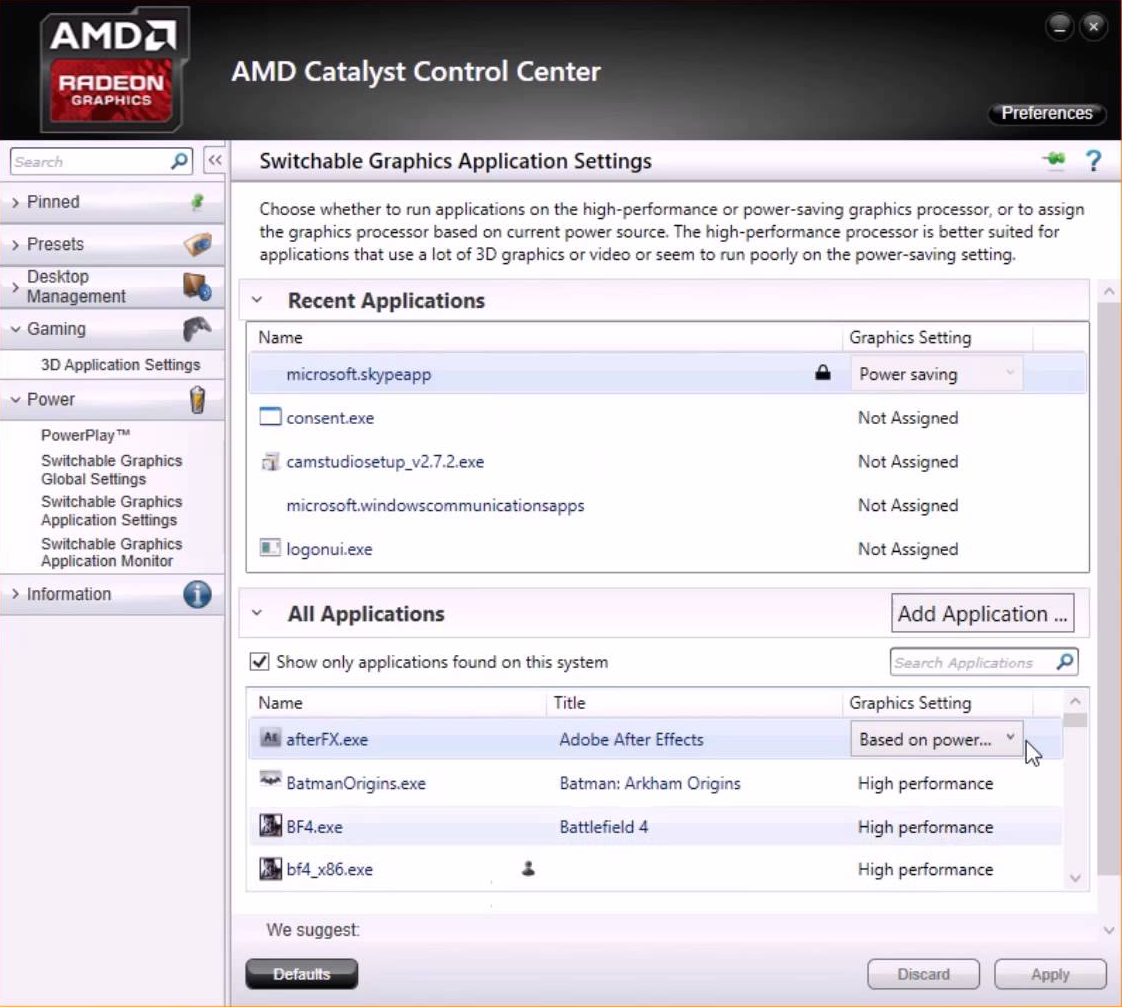
3. If your Catalyst Control Center has the Switchable Graphics tab go there and browse to locate seratovideo.exe and set it for High Performance. Click Apply
For users having Intel as integrated GPU and AMD as dedicated GPU
Follow the steps below to force run BlueStacks on integrated graphics.
1. Open AMD Radeon settings by right-clicking on your desktop and then selecting AMD Radeon settings.
2. You will be directed to the AMD Radeon settings, where you have to click on the System tab.
3. In the system tab, you will see a "Switchable graphics option" where you can choose the power mode for your application. The available mode automatically selects between the GPU.
Please follow the list below for a detailed description:
High performance: This setting will set the application to always use the discrete graphics adapter for the best performance.
Power saving: This setting will always use the integrated graphics adapter to maximize battery life.
Based on power source: This setting will automatically switch between discrete and integrated adapters as needed.
4. To run BlueStacks on your dedicated graphics card, you have to change the power mode to "High Performance" for both HD-Player.exe and Bluestack.exe. You can access the various modes by clicking on the drop-down menu as shown below.
5. Change the power mode for BlueStacks by clicking on Bluestacks.exe and selecting "High Performance" from the drop-down menu.
Thank you for choosing BlueStacks! We hope you enjoy using it. If you have any further questions, please contact us at support@bluestacks.com. Happy Gaming!
Last updated on April 1, 2020