How will this help?
This detailed guide will help you enhance your gaming experience by creating intuitive scripts for various actions performed while playing.
This article will answer the following questions:
Before reading further, watch this video to know how to use scripts on BlueStacks.
Commands on BlueStacks for running scripts
Scripts are sequences of actions (such as keystrokes, mouse clicks, delays, etc) that can be triggered by a specific key. It’s a powerful feature to extend the existing key mapping control. You can define any action sequence as you want and activate them using your own special key.
Here are the commands available for scripts on BlueStacks:
| Keyword |
Syntax |
Short Description |
| # |
# this is a comment |
Comments begin with #. Everything until the end of the line is considered a comment and is ignored.
A comment can be on a line by itself or can be placed at the end of a command on the same line. |
| keyDown |
keyDown key
e.g.
keyDown TAB |
Key is pressed and is not released until the keyup command is encountered for the same key.
Mapping for the key is executed if one exists. Otherwise, the keyDown input is forwarded to android. |
| keyDown2 |
keyDown2 key
e.g.
keyDown2 TAB |
Key is pressed and is not released until the keyUp is encountered for the same key.
Mapping is not executed and key down input is forwarded to android. |
| keyUp |
keyUp key
e.g.
keyup TAB |
Key is released. Mapping is executed if one exists; otherwise, keyUp input is forwarded to android. |
| keyUp2 |
keyup2 key
e.g.
keyup2 TAB |
Key is released. Mapping is not executed and keyUp input is forwarded to android. |
| mouseDown |
mouseDown x y
e.g.
mouseDown 44.0 55.5 |
The left button of the mouse is pressed at location x, y. All locations are in screen percentages so that the same script can work across different resolutions. |
| mouseUp |
mouseUp |
The left button of the mouse is released. No coordinates are required. |
| mouseMove |
mouseMove x y
e.g.
mouseMove 4.56 5.67 |
Mouse moves to new location x, y |
| touch |
touch x1 y1 x2 y2 x3 y3
e.g.
# 3 fingers
touch 4 5 6 7 8 9
# 3rd finger lifted
touch 4 5 6 7
# fingers 1 and 2 move
touch 5 6 7 8
# fingers 1 and 2 lifted
touch |
Touch input with the current set of touchpoints specified. Series of touch commands can be used to create arbitrary multi-touch input.
Up to 16 touchpoints are supported. But keep in mind that other touchpoints from other controls are aggregated before sending to android. |
| text |
text “text”
text backspace 2
e.g.
text “hello world” |
Send text input to android. This can be in any language. The format should be utf8. |
| mouseWheel |
mouseWheel x y d
mouseWheel 44.0 55.5 1
mouseWheel 44.0 55.5 -1 |
Send mousewheel event to keymapping which will convert it to zoom or scroll accordingly |
| wait |
wait msecs
e.g.
wait 24 |
Waits for the specified number of milliseconds before executing the next command. |
Higher Level Primitives.
| Keyword |
Syntax |
Short Description |
| onMouseMove |
onMouseMove |
This provides finer control over execution of script. Different sets of commands can be provided for executing when the mouse is moved.
Commands following the onMouseMove command are executed when the trigger key is pressed and the mouse cursor is moved
|
| abort |
abort |
It aborts the execution of a script.
|
|
onRelease
|
onRelease
|
This provides finer control over the execution of the script. A different set of commands can be provided for executing when the trigger key is pressed and released.
All commands from the top of the script until the onRelease command are executed for as long as the trigger key is pressed.
Commands following the onRelease command are executed when the trigger key is released.
|
|
dTouch
|
onMouseMove
dTouch x+a y+b x+c y+d… x+u x+v
# take two touch points x+3 y x-3 y
dTouch x+3 y x-3 y
onRelease
abort
|
The dTouch command is specific to the mouse movement. Hence, it is necessary to use onMouseMove command at the start of the script.
dTouch can be used to make a touch gesture on-screen with offset to current mouse location x y. Multiple points may be specified to generate the touch point.
a,b,c,d are offsets of the touch points from the current mouse location x y.
onRelease abort command ensures that the script stops as soon as the trigger key is released.
|
| tap |
tap x1 y1 x2 y2 … xn yn delay |
This does a tap gesture. Single or multiple touchpoints can be specified. The touchpoint(s) are held for a specified delay. If the delay is not specified it is assumed to be 50msec.
Delay is specified in milliseconds. This is the amount of time the entire swipe gesture takes.
Up to 16 touchpoints are supported. But keep in mind that other touchpoints from other controls are aggregated before sending to android.
|
| swipe |
swipe x1 y1 x2 y2 … xn yn delay
e.g.
# swipe 4,5 to 40,45
# take 100msecs
swipe 4 5 40 45 100 |
Do a swipe gesture. Multiple points may be specified which the swipe goes through.
Delay is specified in milliseconds. This is the amount of time the entire swipe gesture takes. |
| loop / loopEnd |
loop n
.
.
loopEnd
onRelease
abort
|
Commands following loop command until loopEnd are executed n times.
If n is not specified, the loop continues indefinitely or until the script trigger key is released.
The onRelease abort command ensures that the script stops running when the trigger key is released.
|
| enterShoot |
enterShoot |
Enter shooting mode used to play FPS games. If a Pan control does not exist in the current scheme this is ignored. If shooting mode is already enabled this has no effect. |
| exitShoot |
exitShoot |
Exit shooting mode. If a Pan control does not exist in the current scheme this is ignored. If shooting mode is disabled this is ignored. |
| toggleShoot |
toggleShoot |
Toggle shooting mode. If a Pan control does not exist in the current scheme this is ignored. |
Opening the Controls Editor to create a script
To create a script, you need to launch the game for which you want to create scripts and then, open the Controls Editor. Choose your version of BlueStacks below to know how to access the Controls Editor:
For BlueStacks 4.230 and above
There are two ways to access the Controls Editor on BlueStacks 4.230:
- By right-clicking on the Game Controls icon on the side toolbar while playing a game, as shown below.
- By left-clicking on the Game controls icon and selecting Open advanced editor from the menu.

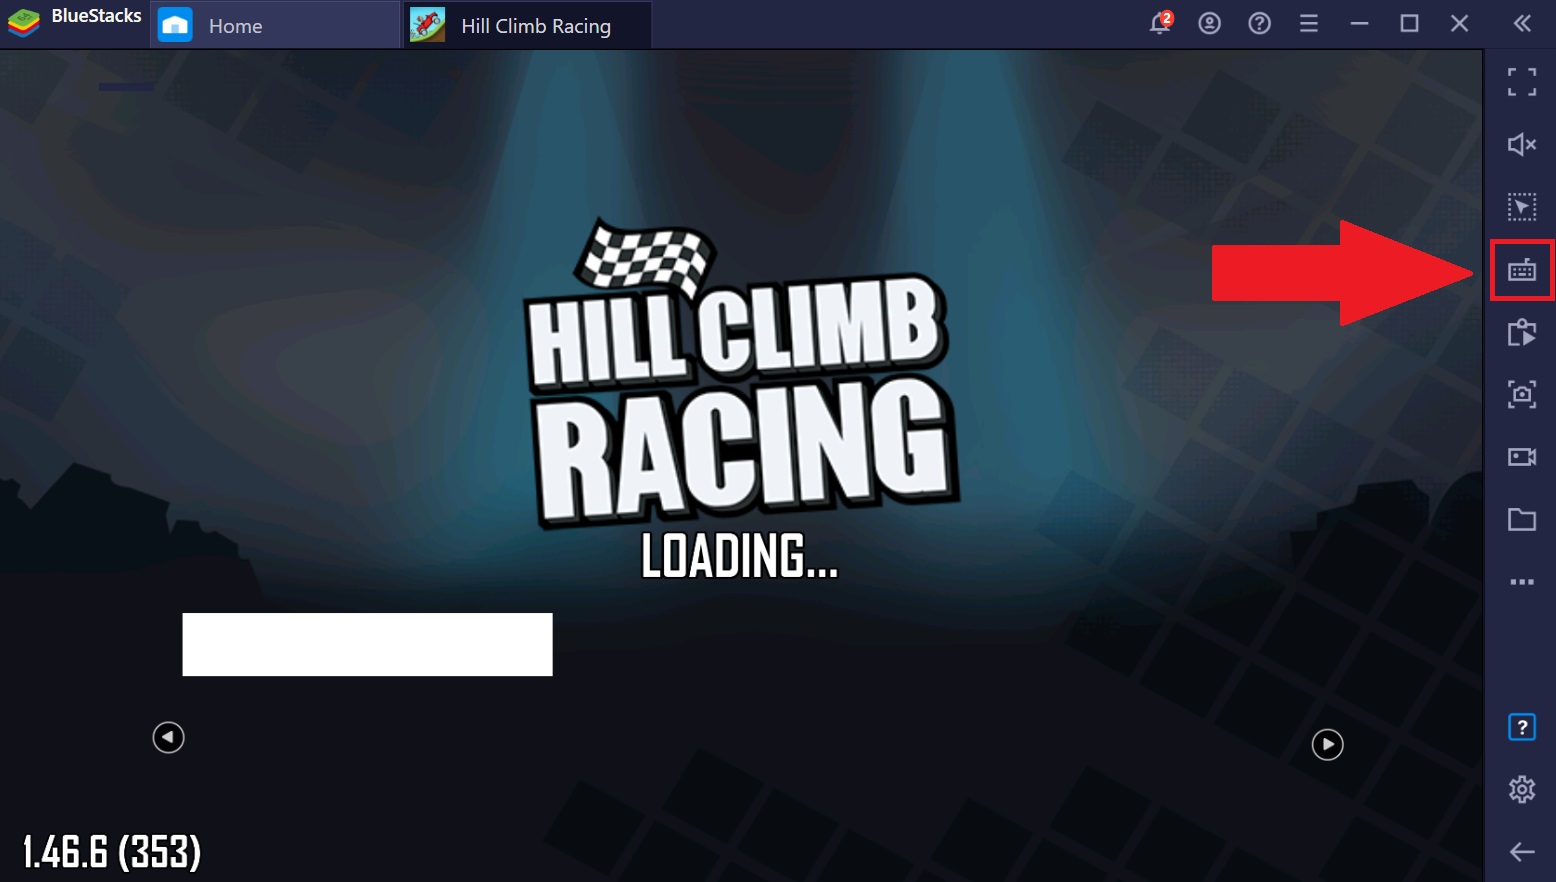
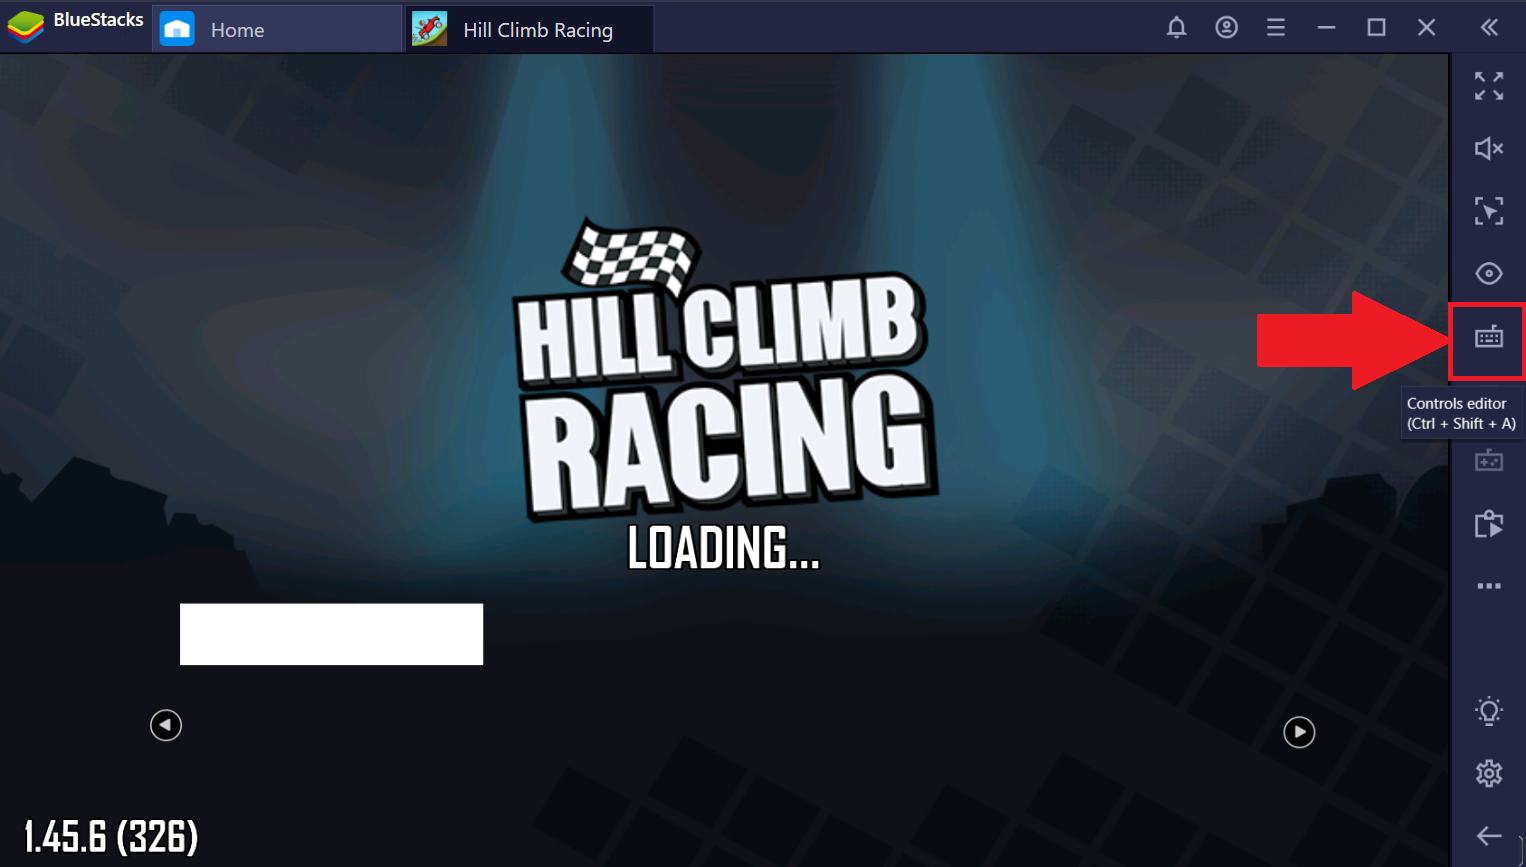
For BlueStacks 4.220 and below
- Click on the keyboard control icon on the side toolbar, as shown below.
Using the Controls Editor to create a script
When you open the Controls Editor, a new window will appear alongside, as shown below. You will be presented with various options for the types of key controls you wish to create.
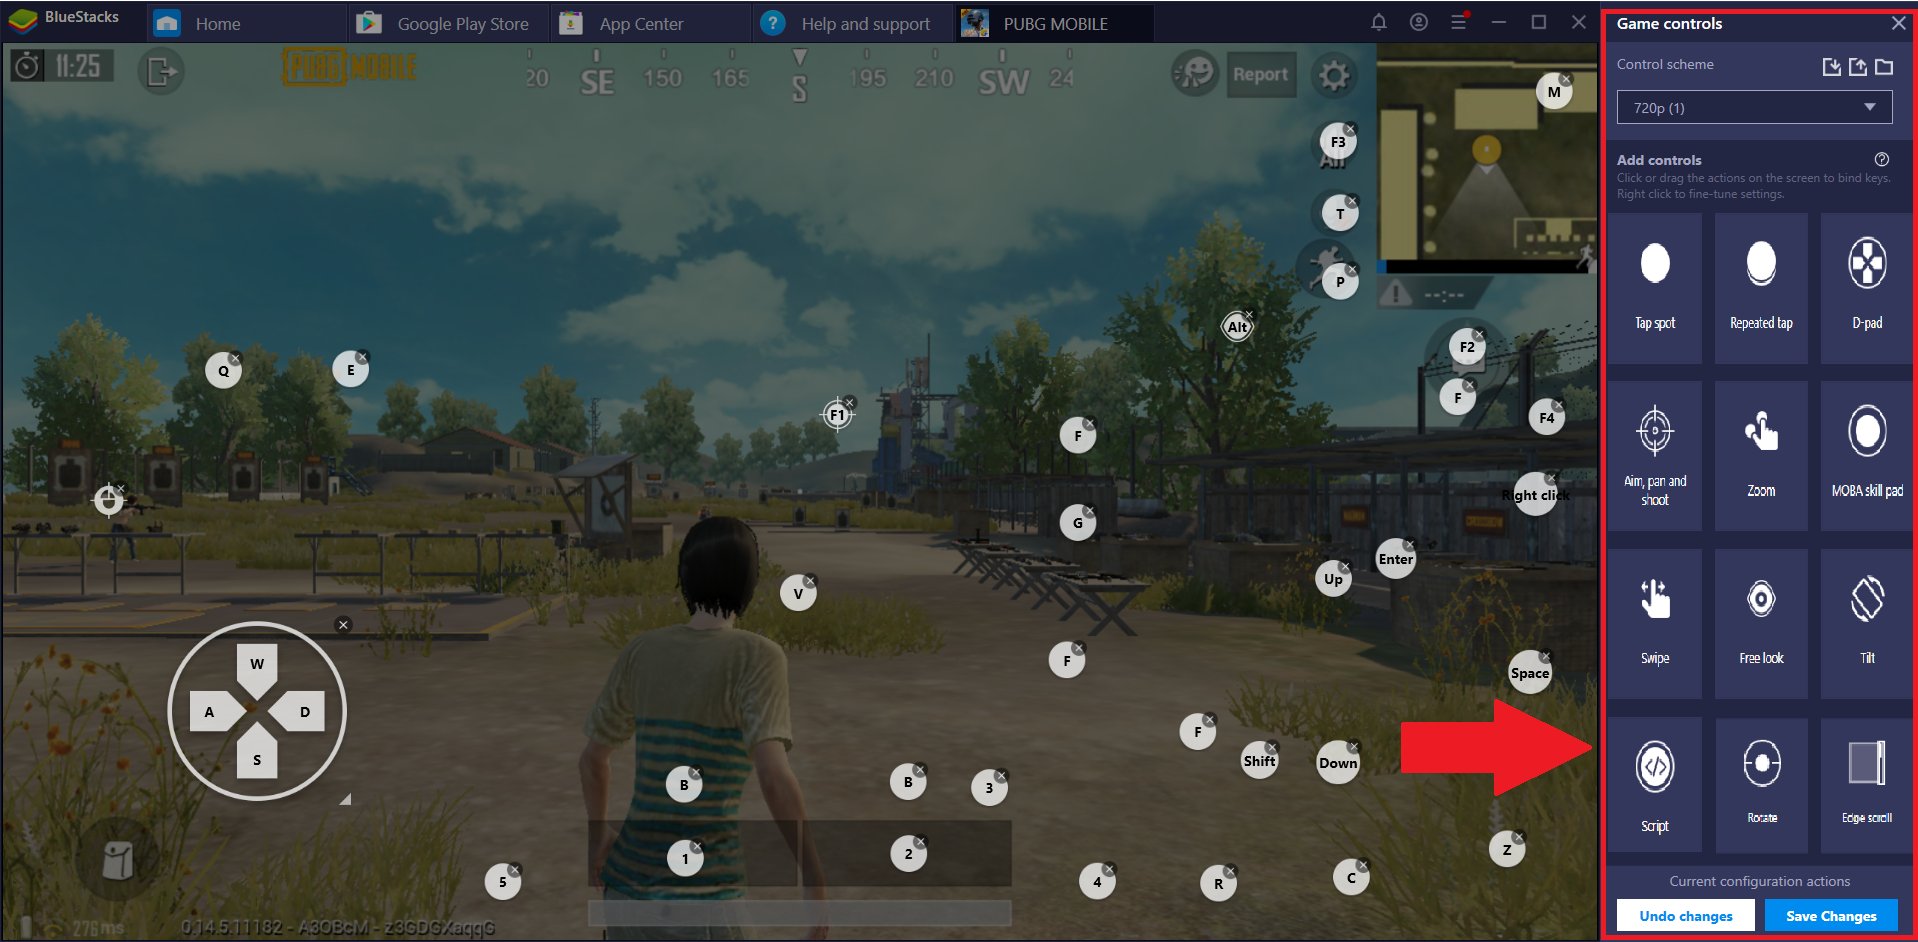
1. To create a script, drag the script button from the Add Controls menu and drop it on a functional area. For explanation purposes, let us drop it on the bag icon at the bottom left corner, as displayed in the image below.
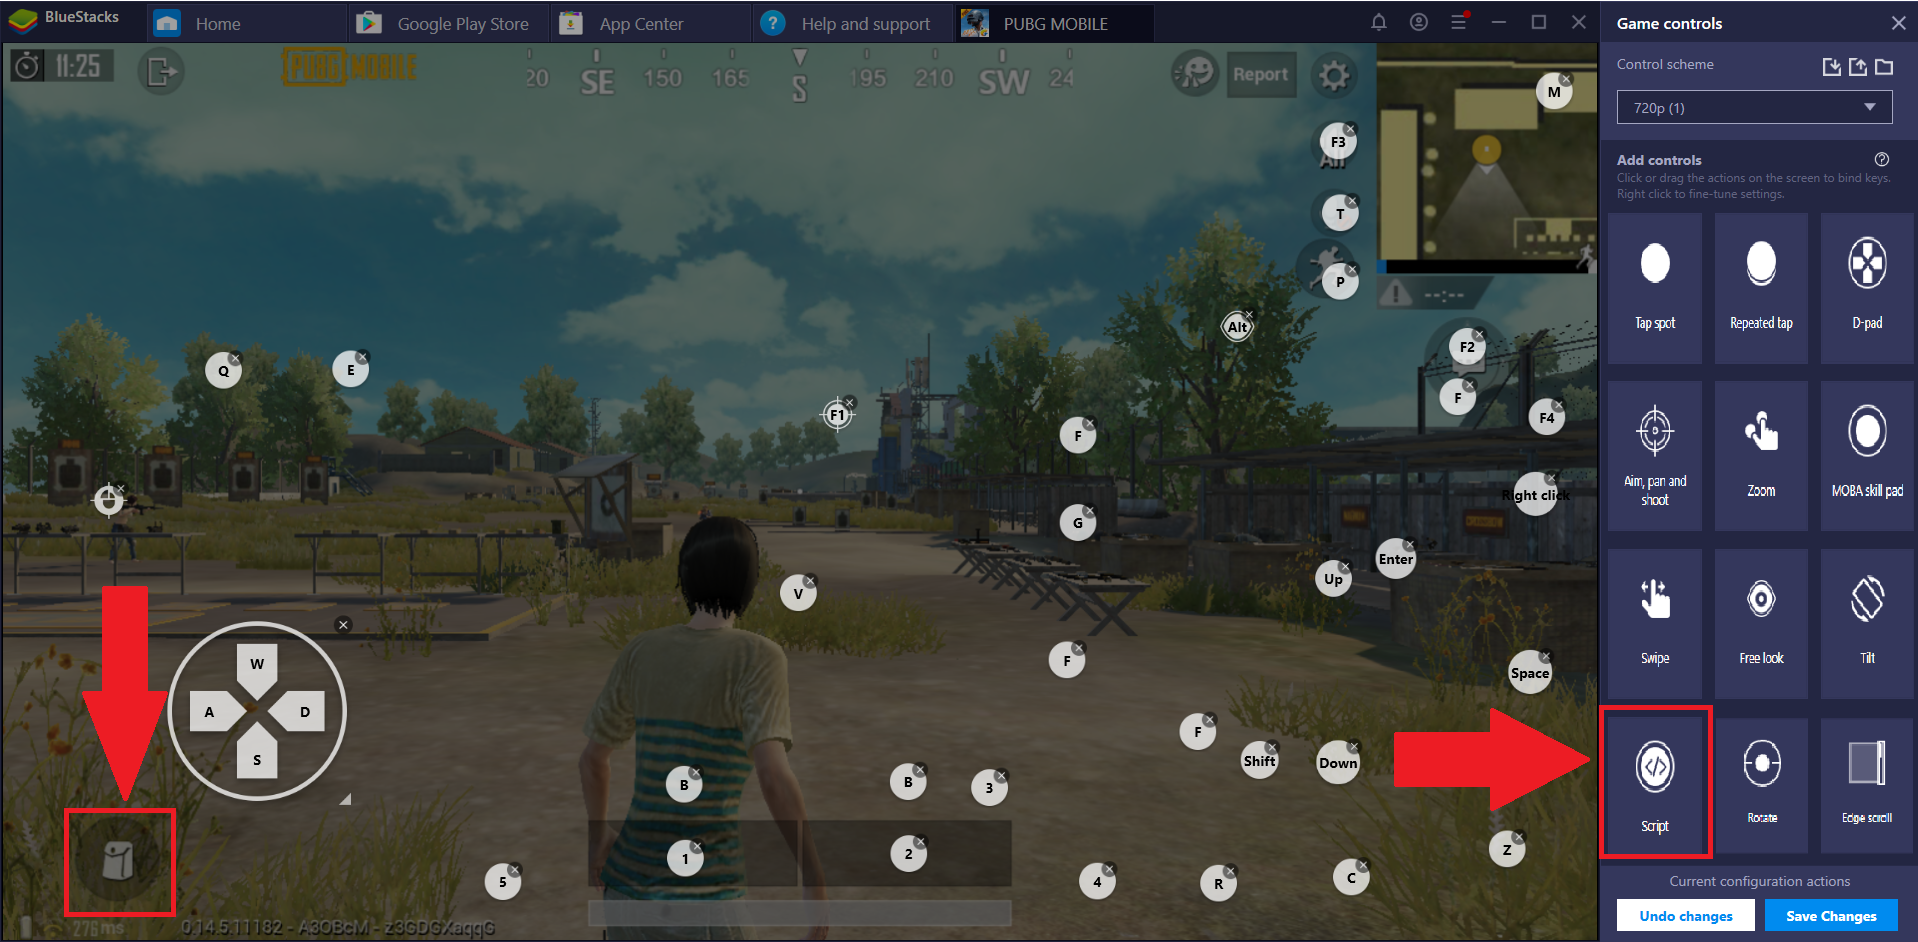
2. Now, assign a key for this function. Here, the TAB button is assigned to initiate the command added as a script.
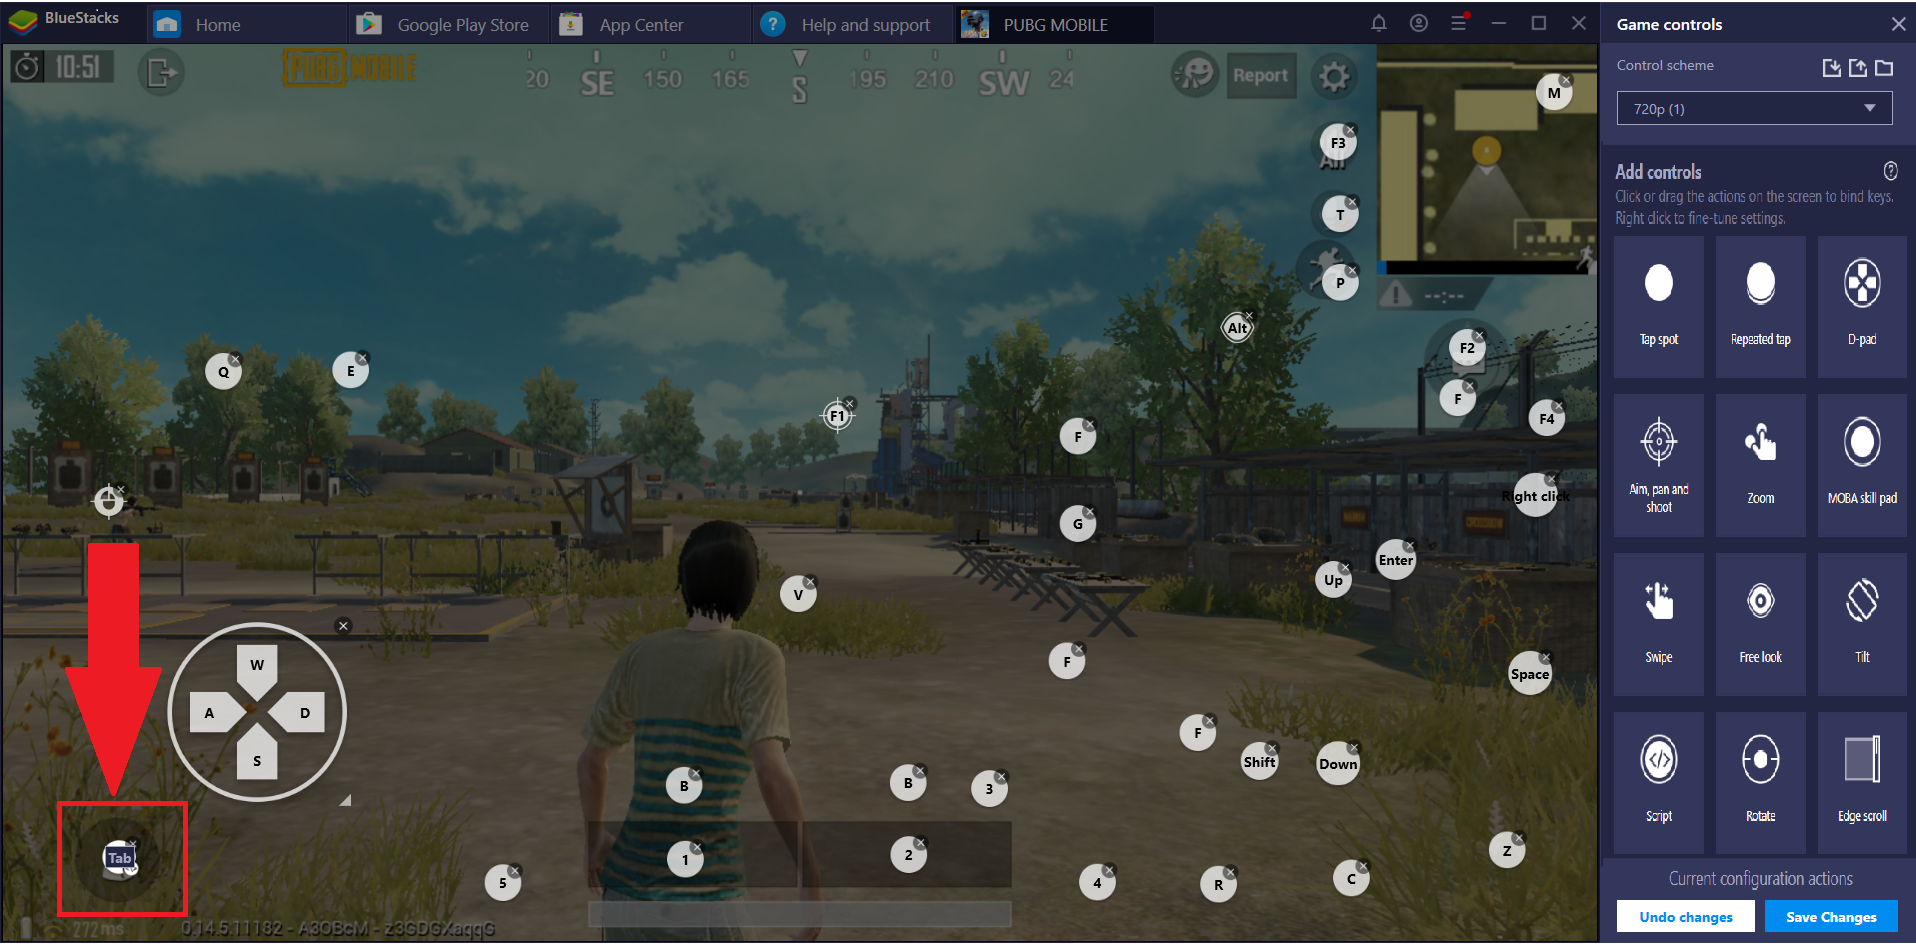
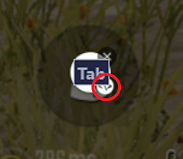
3. Click on the "<\>" icon under the script button to start adding the commands for this Script.
4. Once you click on the "<\>" icon, the cursor coordinates will start showing on the screen. When you right-click on a spot on the screen, the coordinates for that point will be shown in the script editor, as displayed below.
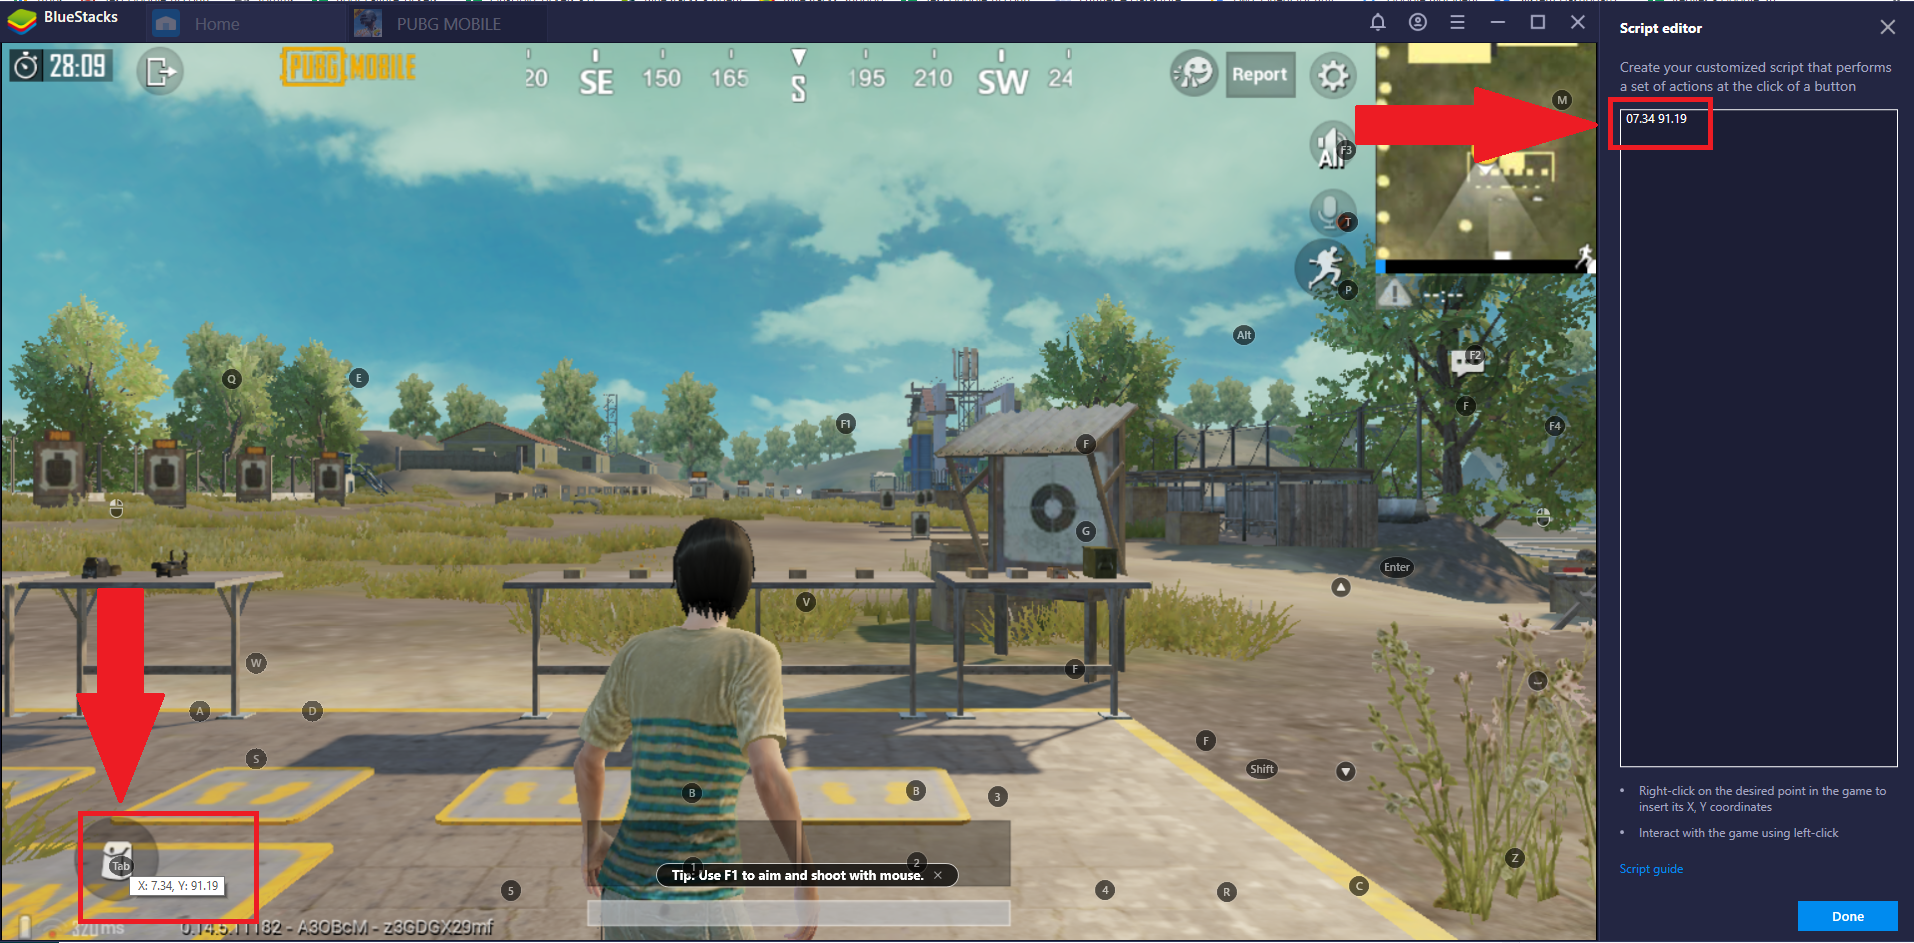
Here, the right-click was done on the bag icon.
5. You can start adding scripting commands against the coordinates displayed.
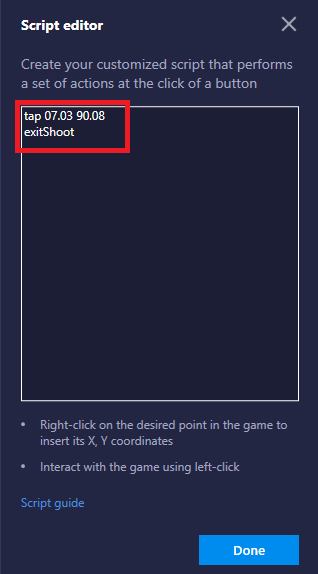
Here, the command:
tap against the coordinates means that when we press TAB it will tap once on the bag icon.
exitShoot against the coordinates means that when we press TAB it will exit Shooting mode in the game.
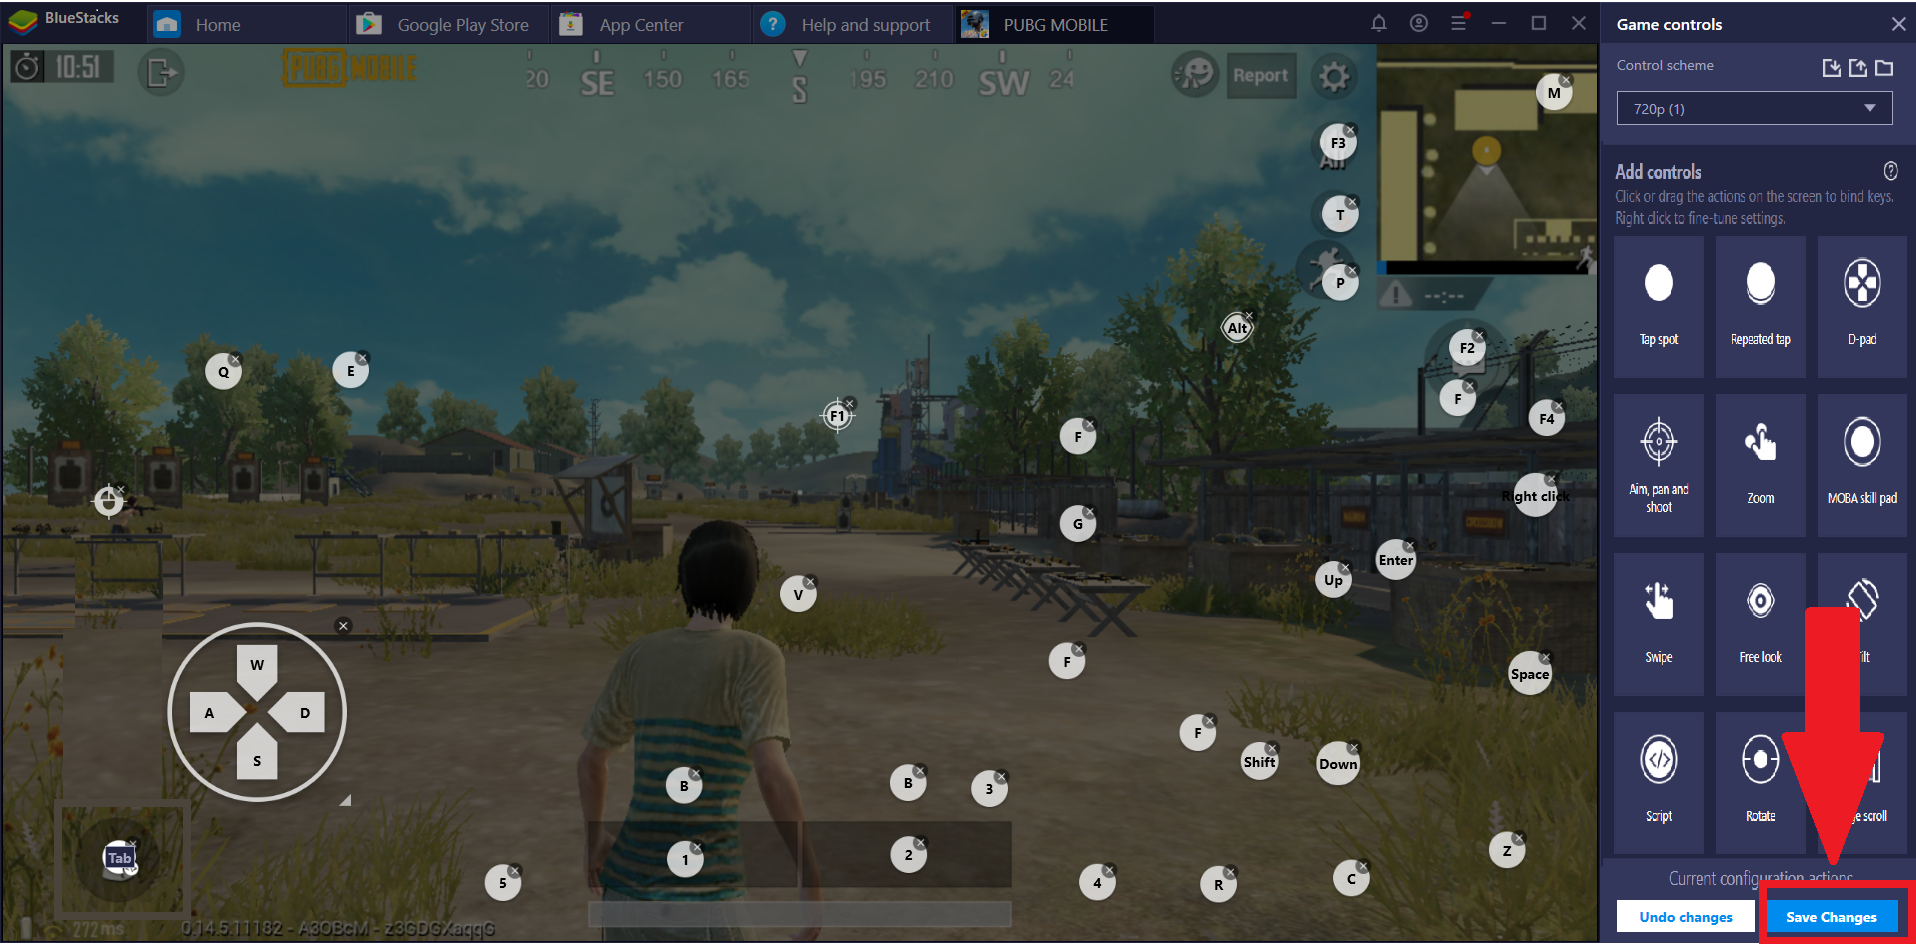
After adding commands, click on the done button.
6. Click on Save changes.
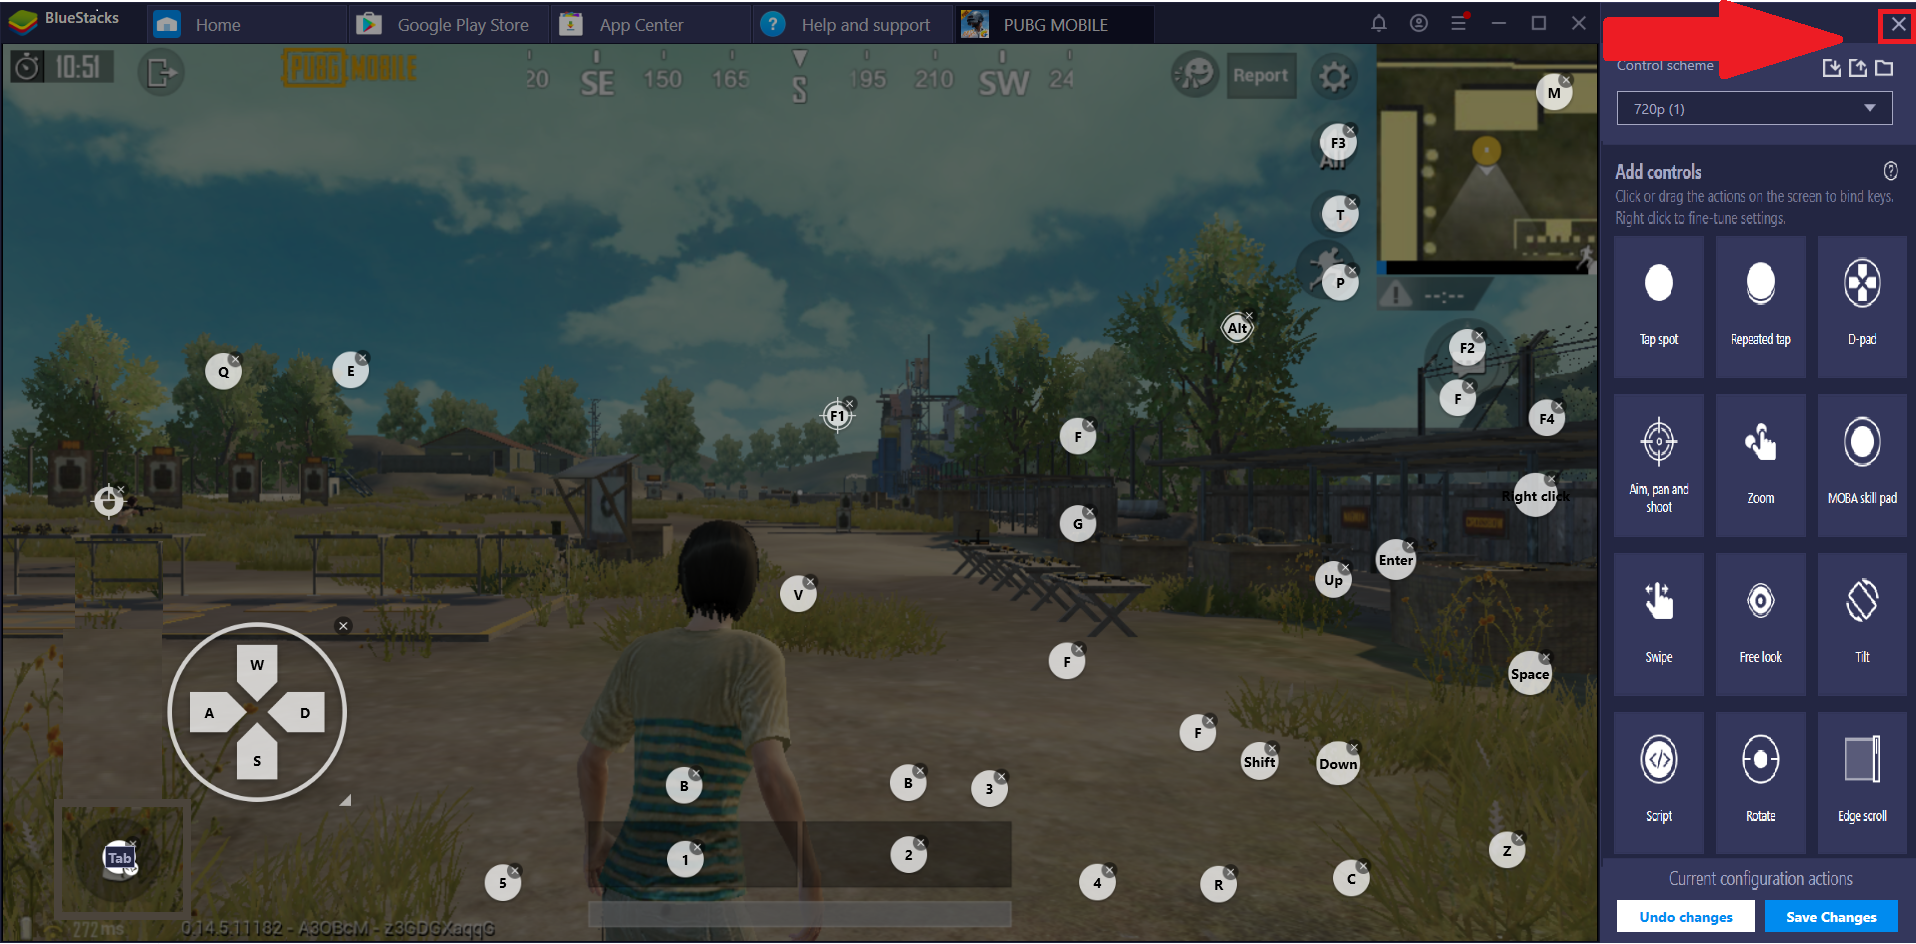
7. Once the changes saved, you can close the Controls Editor by clicking on X, as shown below.
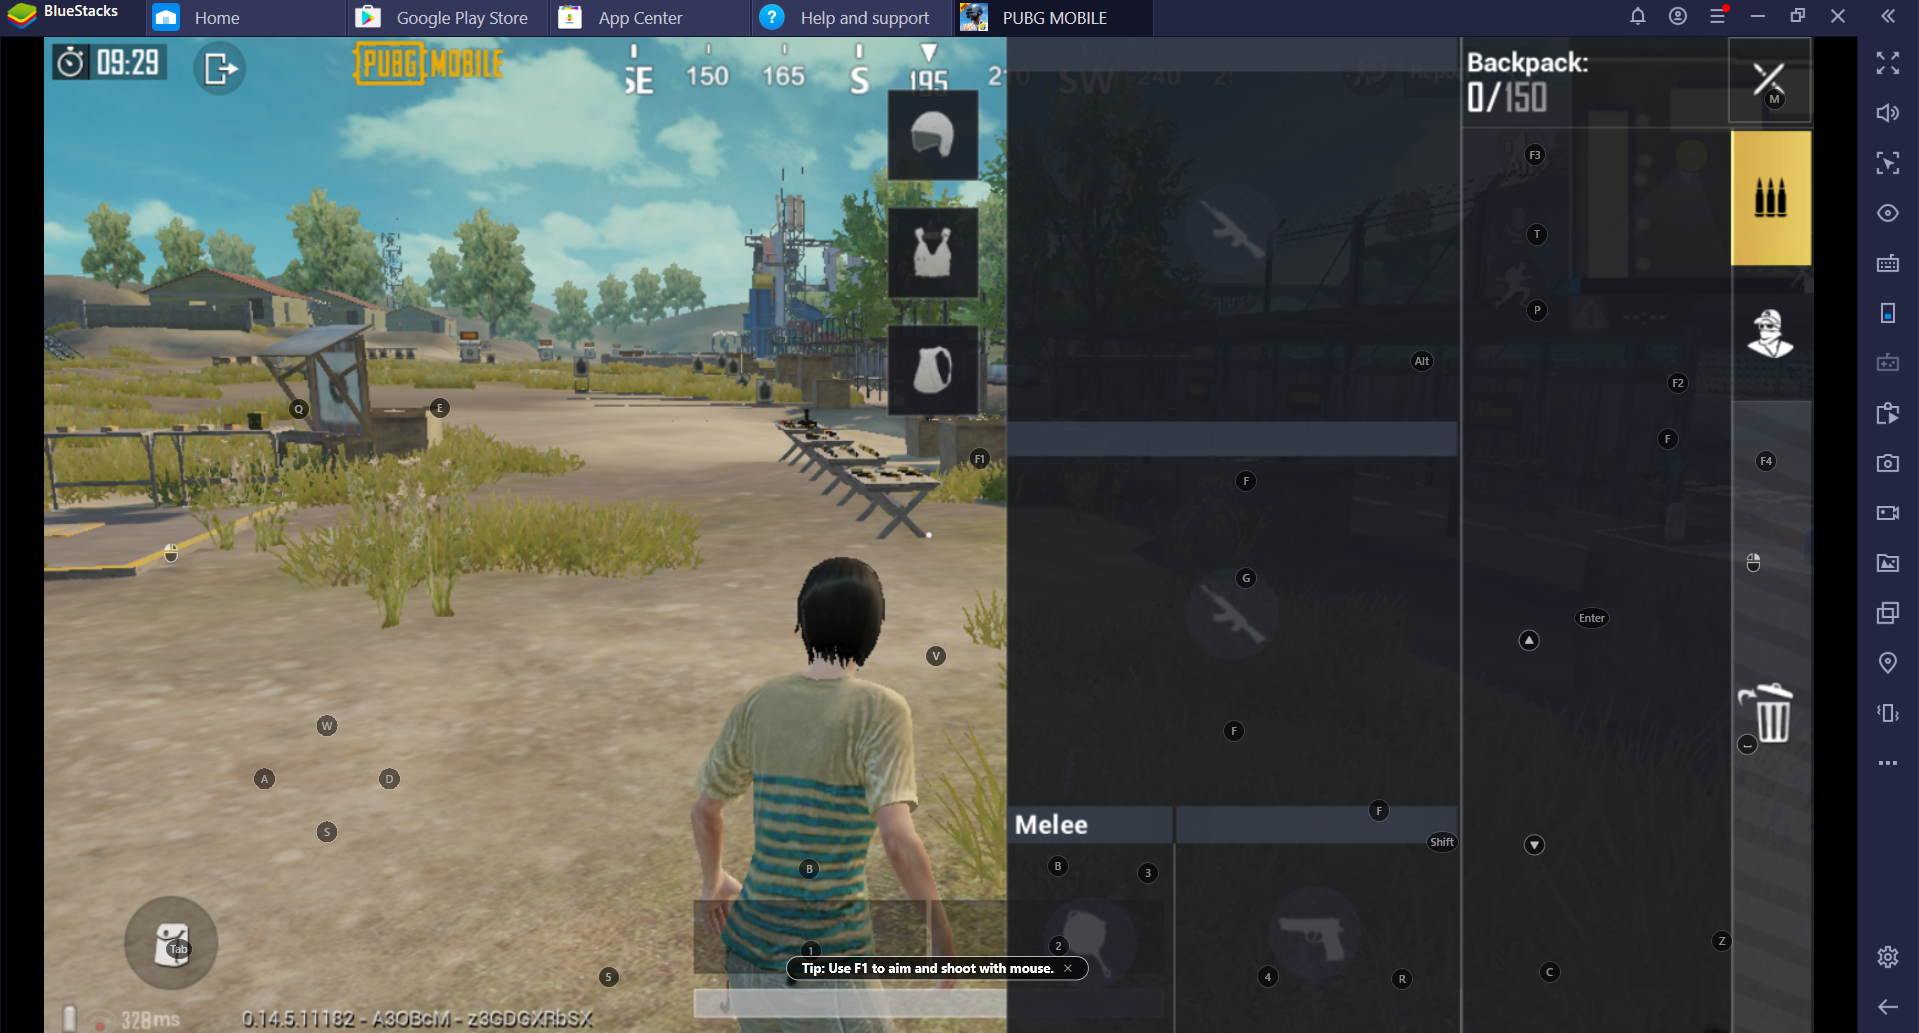
8. Once the above steps are complete, you can see the changes reflect in the game.
In the below screenshot the player is in Shooting mode.
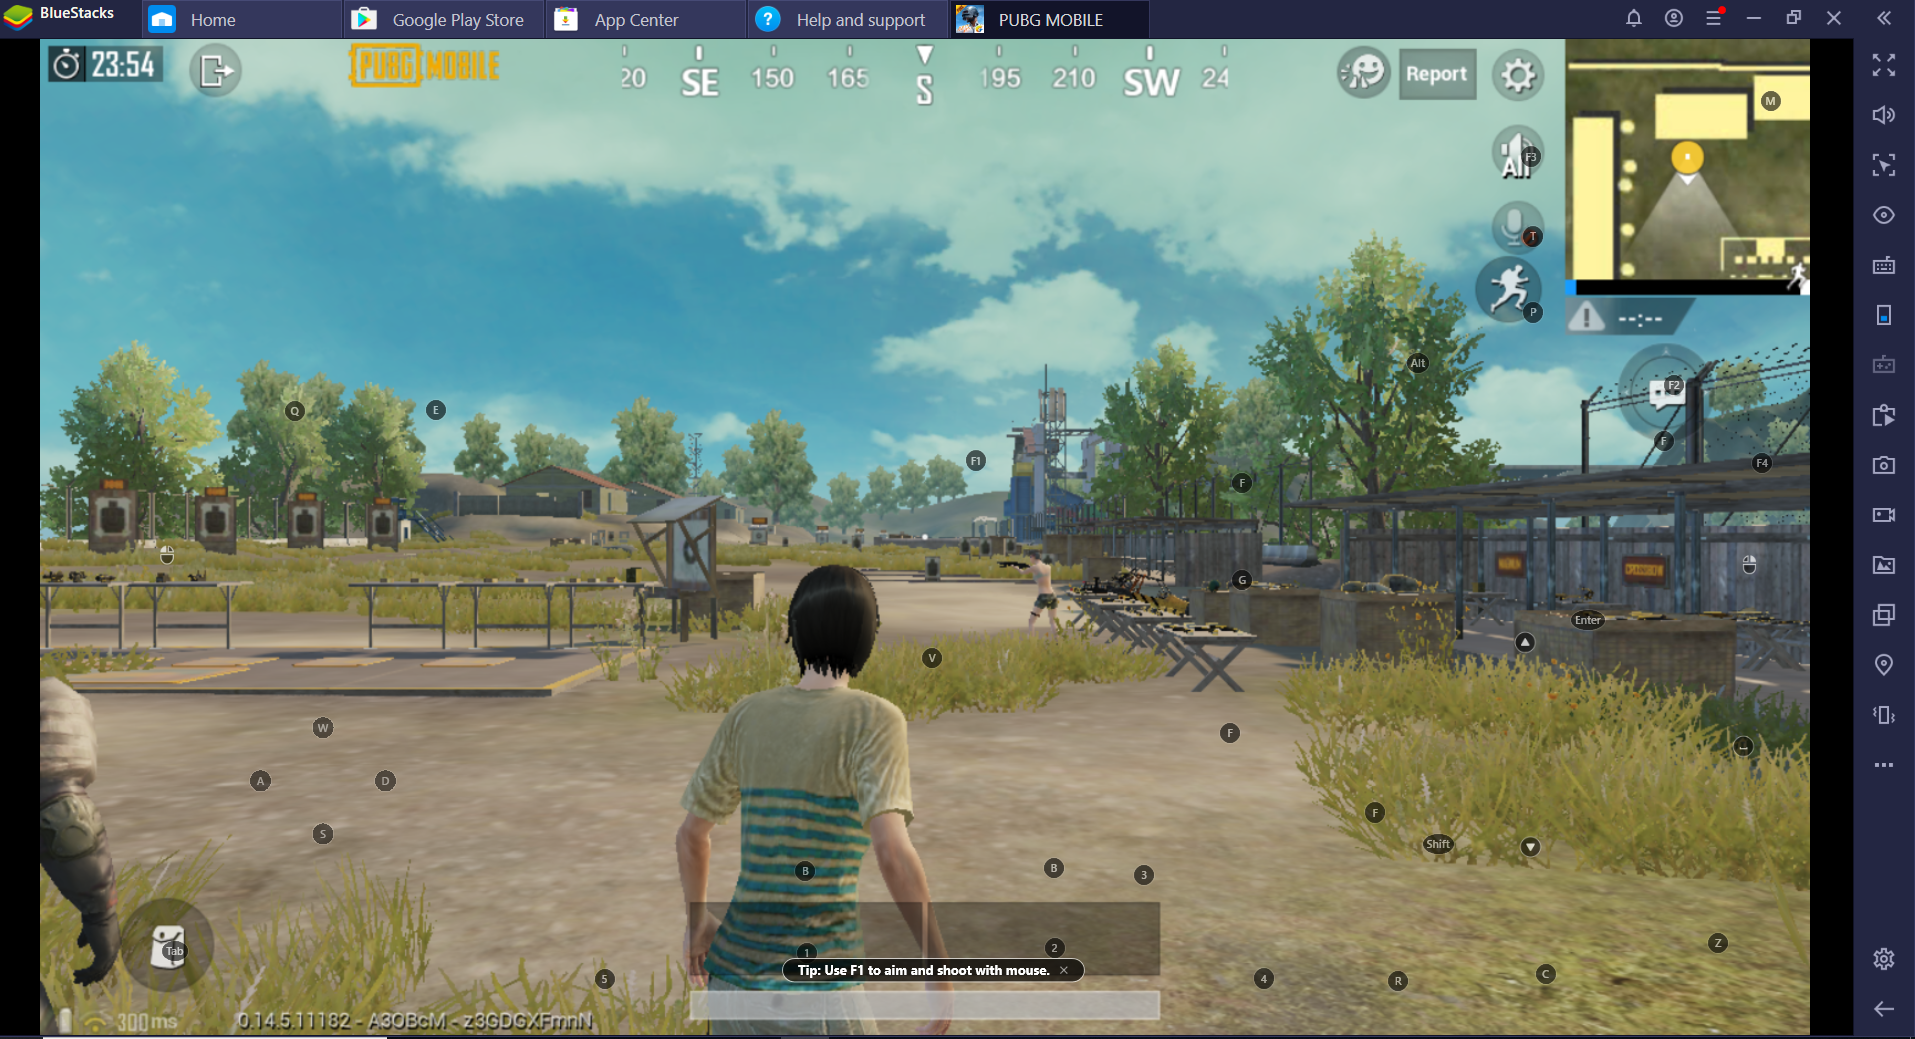
Once, TAB is pressed the bag will open and the player will come out of Shooting mode.
Thank you for choosing BlueStacks. We hope you enjoy using it. If you have any further questions, please contact us at support@bluestacks.com. Happy Gaming!
Last updated on October 12, 2020.